Category Archives: Movies & TV

HTPC update

It’s been a couple of years since I moved my wall of discs to a NAS/Kodi setup and it’s worked admirably, growing as I added storage capacity to its current peak at 16TB. The onward march of technology, however, has uncovered a few cut corners that I’ve taken the opportunity to fix.

New hardware

Intel D34010WYKThe first is a simple lack of horsepower. HEVC is here and I’d like to use it, but my Zbox drops frames even at DVD resolutions. What’s more, the old AMD chipset is no longer really supported, so the recently lost ability to play VC-1 smoothly looks unlikely to come back. I wanted HEVC and I wanted good Linux driver support, which means I wanted an Intel chip.

Add to my list of problems to solve the inability to turn on my HTPC with my Harmony remote and the lack of hardware support for bitstreaming HD audio to my receiver (those pesky AMD Linux drivers again), both of which would handily be fixed by switching to Intel. I therefore picked up an Intel D34010WYK NUC used on eBay for only £142 shipped. It came ready to go and the Haswell (2013) Core i3 CPU was more than capable of meeting my needs. It even came with Windows 10 installed.

I’ve recently acquired a Raspberry Pi 3 and tested that out to see whether a £30 computer was up to the task, something I dismissed out of hand during my original build. Perhaps the fact that I went on to buy a NUC answers that question. The Pi’s media playback performance is impeccable, handling my 1:1 Blu-ray rips without a single dropped frame. It chugged massively when browsing my library, however, with dozens of high-res movie posters on-screen at once being a big ask for a device with only 1GB of RAM. And, frankly, once you’ve added a nice case, a messy external IR adaptor, power cables, codec licences, etc, the price difference starts to shrink.

Updated software

LibreELEC logoFirst task, of course, was wiping out Windows 10, saving the key for future use. Massive overkill and much more effort to maintain than a purpose-built media centre OS. My software of choice, XBMC, is now Kodi, and OpenELEC has been supplanted by its better-supported fork, LibreELEC, which works in exactly the same way. I don’t want this to do anything but act as a media centre, so a Linux-based JeOS suits perfectly. If you wanted a bit more flexibility without Windows, Kodibuntu is another option – it’s worked well in my testing, allowing you to quit Kodi for a standard Linux desktop.

I’d only recently become aware of the LibreELEC fork, when trying to find out why OpenELEC was lagging behind standalone Kodi – it hasn’t had a stable release since February and hasn’t yet updated to Kodi 16, even as version 17 nears release. Most of your developers jumping ship will do that, I guess. LibreELEC is getting more regular updates and isn’t constantly trying to sell you crappy embedded boxes. Double win.

Problems solved?

The NUC’s performance has really impressed me. It boots within seconds and turns on and off with a command from my Harmony hub. Navigating the menus is much snappier than the Zbox, thanks to the boost in horsepower and the move from an old HDD salvaged from a launch PS3 to a shiny new mSATA drive. And, most importantly of all for my purposes, it’s able to run everything I’ve thrown at it, up to and including Blu-ray quality HEVC samples and those VC-1 rips that the old AMD chipset stopped liking. This should keep me well into the 4K generation.

What’s more, it’s able to bitstream HD audio to my receiver, lighting up that lovely DTS-HD or Dolby TrueHD light and saving the trouble of converting my rips to FLAC. The whole thing feels more like a purpose-built media centre than a repurposed PC.

It’s still perfectly possible to build a media centre that will meet the requirements of 99% of users with cheaper hardware. Indeed, those who only want to digitise their modest DVD collection and aren’t fussed about perfect quality from their Blu-ray rips will be more than happy with a Raspberry Pi 3, which is probably only a couple of generations away from matching my NUC in multimedia performance. What this has shown me is that it’s not a huge investment to reproduce the experience of a dedicated set-top box with only middling hardware and free software.

My Pi, meanwhile, is to become a retro emulation box with RetroPie. More on that soon!

Building a £200 HTPC with OpenELEC

Zbox NanoTiny PCs like the Intel NUC are limited as replacements for the desktop, but they’ve come into their own in harnessing the media-decoding prowess of new chipsets to drive an HTPC. Coupled with free media centre software, it’s become possible to put together a powerful little set-top box that can compete with the behemoths of only a few years ago.

It’s actually feasible to do it even cheaper than that if you use a Raspberry Pi flavour of your chosen software, or even adapt an older PC that’s set for retirement, but my desired integration with my existing setup and a handful of esoteric requirements made this an appealing route.

  • Lossless HD audio over HDMI was a must, and many motherboards are finicky about this
  • Built-in wi-fi, SD card reader and IR saves a lot of messing with peripherals and USB hubs
  • I aim to rip Blu-rays to this thing without recompression, and I don’t fancy a £30 computer to handle those
The hardware

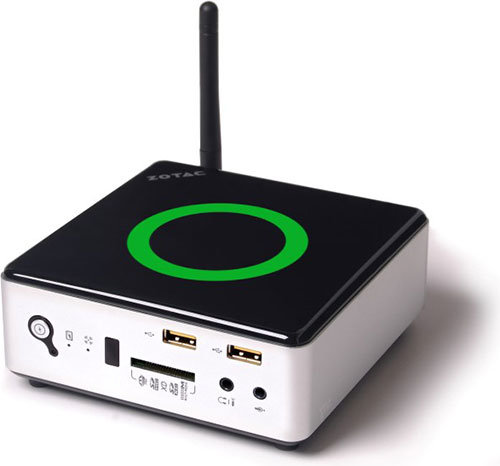
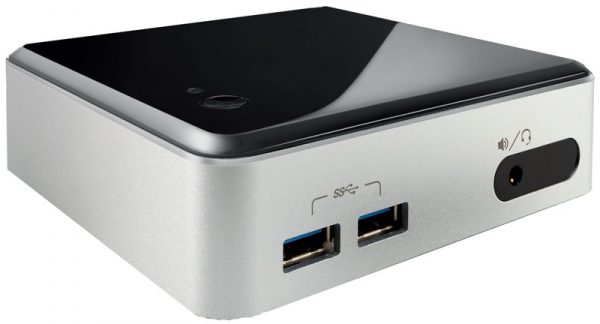
I spent £170 on a Zotac Zbox Nano AQ01, which nets you the box without RAM or internal storage. I recycled a 2GB RAM stick from when I upgraded my laptop – somewhat anaemic, but fine if media playback is all you’re planning – and dug out the old 60GB HDD that used to inhabit my PS3, which is more than capacious enough for the OS if you’re using external media storage. The box has seven USB ports (2x USB 3.0 and 5x 2.0), so you have plenty of scope to add capacity later.

If you don’t have the skeletons of various computers around to raid, you could plump for the more expensive Plus model, which includes 4GB RAM and a 500GB HDD. An even cheaper storage option if you’re relying on external or network storage and want a pure XBMC machine is a low-profile USB flash drive like a SanDisk Cruzer Fit, which can slot into the back and never have to be seen again. You’ll want at least 8GB as even though XBMC isn’t very large, the library of high-quality artwork it caches for your movies can be.

The Zbox AQ01 runs on AMD’s A4-5000 platform. That’s based on the same Jaguar architecture found inside the PS4 and Xbox One and has GPU-accelerated video decoding, ensuring smooth playback of high-quality video. It’s more than capable of general computing tasks if you install a full OS like Windows or Linux on it, but I’m not interested in that.

It has HDMI (also DisplayPort), optical audio, Wi-Fi (802.11ac), Bluetooth, gigabit Ethernet, a 7-in-1 memory card reader and, pleasingly, a built-in IR receiver. In short, it’s incredibly well-equipped considering the compromises I was looking at making in building my own, much physically bigger and more expensive, HTPC.

The software

For this project I’m sticking with what I know, which is XBMC. I first used it circa 2004 when it was Xbox Media Center, a staple of the modded Xbox scene, and since then it’s expanded to other platforms. I’ve opted for its OpenELEC form, a stripped down version of Linux bearing only what it needs to run XBMC. It’s fast, light on resources, and takes up very little space. A similar option is XBMCbuntu, which leans slightly more towards flexibility at the expense of hardware requirements.

XBMC also runs atop Windows and the Zbox will happily run it, but a licence costs almost half as much as the machine, so forget that.

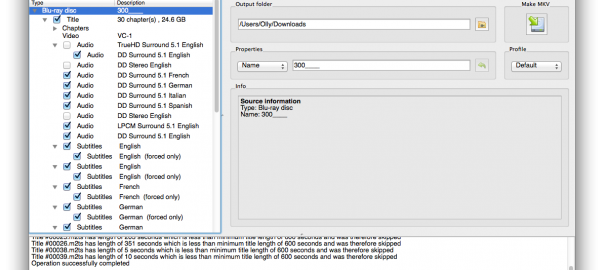
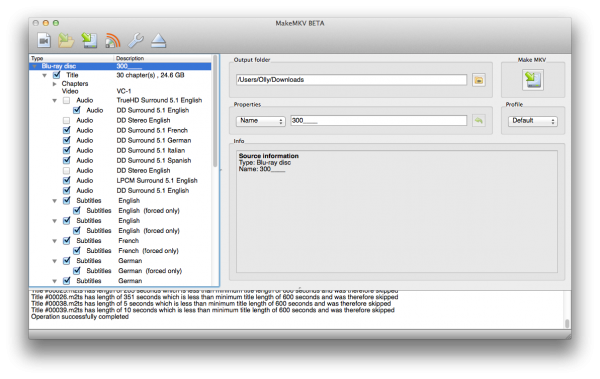
The process of ripping DVDs and Blu-rays is handled on my main computer, using MakeMKV to generate a lossless rip and HandBrake to compress the DVDs. Using this, I can get a DVD movie into around 1.5GB with little quality loss. BDs are staying in all their 30GB+ glory, HD audio and all. I started with a 1TB USB drive that didn’t last me through a tenth of my collection before I had to move to bigger, more expensive network storage (a Synology DS214se with 2x 4TB HDDs), but it should suit most users.

Installation

With the Zbox all working and the OpenELEC installer on a flash drive, all that needs doing is popping that into a USB slot, turning it on, and running through the five-minute installation. I couldn’t get the Mac script to correctly create a bootable USB drive, but I ran the Windows version instead without issue. That’s really all there was to the setup, as things are basically ready to go from the start; run through the settings to get things configured how you want them, point XBMC at where your movies and TV shows are stored, and you’re off.

Skins and add-ons

I’ve frequently found that UI design isn’t a strong point of open source software, and the majority of XBMC skins I tried did indeed look like they were designed by teenage boys. The default skin, Confluence, is a solid choice, though. My only major complaint was that it lacked a library view that fulfilled my dual aims of putting the lovely artwork and metadata to good use and being usable with my large library. The ‘fanart’ view wastes a lot of space.

XBMC Confluence skin

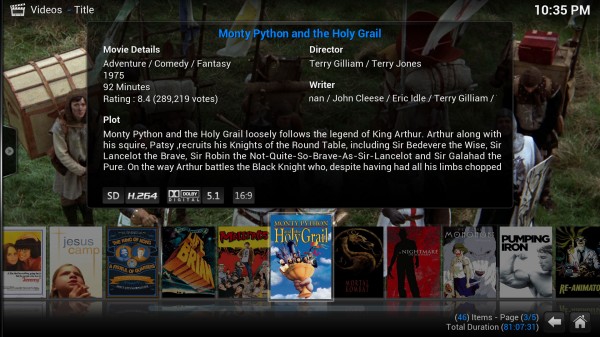
I eventually settled on Aeon Nox. The more granular control over the main menu is nice, allowing me to drop options like sets, which I’m never likely to use, and create my own shortcuts to unwatched movies and similar filtered lists. A classy set of background images reins in the main menu − that open source design again − and the ‘infoview’ option allows me to see more movies at once without sacrificing the poster art and metadata:

XBMC Aeon Nox skin

An honourable mention goes to Quartz, which convincingly imitates the Apple TV interface. Very slick and would have been a contender for my skin of choice were it not for the lack of anything as good as the above view.

Issues

A niggle more than anything would be that programming my Harmony remote to perform anything but the most basic functions – anything not on a generic Windows Media Center remote – is a world of XML files and key listings that I frankly can’t be bothered to get into. I also can’t turn on the Zbox with the remote, though I sense that’s going to be a common limitation unless I fancy leaving the thing in hibernation 24/7. Shutting down that way works fine.

I’d also suggest Intel or Nvidia graphics hardware if bitstreaming HD audio is your intention. AMD’s Linux drivers are a bit naff, and although it’s not impossible to get it working, it’s a daunting process. For now I’m letting XBMC handle TrueHD and converting DTS-HD to FLAC during the ripping process. If a future OpenELEC update enables proper HD audio support, brilliant; if not, no big deal.

Should you be less finicky about such things, though, you’ll have no problems with this setup. It’s going to take me a good while to get everything ripped – 284 down, approximately 500 to go at the time of writing, not counting TV shows – but when it’s done I look forward to reclaiming some shelf space and having an on-demand box that, unlike Netflix and friends, actually has a library I’m interested in.

Converting Blu-ray HD audio to FLAC

As I mentioned in my first look at ripping Blu-rays, converting uncompressed PCM and lossless Dolby TrueHD and DTS-HD Master Audio to FLAC for use in XBMC carries a number of benefits.

  • It’s also lossless, so no quality difference.
  • FLAC is an open, well-documented format and so you’re not reliant on reverse-engineered implementations.
  • XBMC can decode FLAC to PCM and output it over HDMI, whereas it currently can’t for DTS-HD.
  • Hard drive space savings can be significant, especially for PCM soundtracks.

There’s little penalty in terms of the time taken to rip the disc either, as it’s unlikely that your BD drive can copy data from the disc fast enough for the conversion process to become a bottleneck.

What you need

This process still uses MakeMKV, with the feature enabled in by checking the advanced options box in the settings. TrueHD decoding is built in, but you’ll need to find a separate DTS module and point MakeMKV to that.

MakeMKV

All you then need to do it choose the ‘FLAC’ preset when ripping a disc. Otherwise the process is identical.

File sizes

I picked three movies representing the three HD audio formats supported on BD. All were ripped to an MKV file containing only the main video, the lossless main audio track, and no subtitles; file size recorded; then passed through MakeMKV again to convert the audio to FLAC. After conversion, MediaInfo was used to verify that the number of channels, sampling rate and bit depth (some versions of the DTS decoder have a bug that will change 24-bit audio to 16-bit, hence the use of 24-bit audio tracks below) were unaffected.

Movie Audio Original size New size Delta
2001: A Space Odyssey PCM 5.1 (48kHz, 24-bit) 20.10GB 16.38GB 3.72GB (18.5%)
Blade Runner Dolby TrueHD 5.1 (48kHz, 24-bit) 18.22GB 18.08GB 0.14GB (0.8%)
The Bourne Identity DTS-HD Master Audio 5.1 (48kHz, 24-bit) 25.96GB 25.42GB 0.54GB (2.1%)

I noted a few more, with all the data recorded in this spreadsheet. The range of formats reflects the predominance of DTS-HD on Blu-ray these days, but there’s a clear 2-3% gain on substituting FLAC there. It doesn’t sound like much, but it’s half a gig when you’re talking about files of 20GB and up.

Conclusion

According to my unscientific tests, then, converting to FLAC delivers a saving in file size over the untouched original track across the board, with a minimal reduction for TrueHD and a handy half-gig saved on DTS-HD. Obviously, since the others are already losslessly compressed, the biggest gains come over PCM, where FLAC can shave 3.72GB off the size of the 2001 MKV – enough for another couple of DVD rips on my HTPC’s hard drive.

Some notes on ripping Blu-rays

Owing to my current HTPC project, about which a more comprehensive post is on the way, I’ve spent many hours over the last week delving into the murky, unexplored realm of ripping Blu-rays. This being a more niche format, requiring more unusual hardware and scads of hard drive space, the tools required aren’t quite as polished and straightforward as ripping a DVD, but a bit of trial and error has taught me a few tricks.

Tools

The most important tool is MakeMKV, which is free while it’s in beta. It’s a great app that does one thing and does it very well: rips DVDs and Blu-rays from the disc to an MKV file. No conversion or compression – except for one exception, which I’ll come to shortly. DVDs get run through HandBrake since a heavily compressed source isn’t going to suffer too much and the file size can be cut by ~60%, but I want my BDs in their full glory.

MakeMKV

File sizes that this approach result in range wildly, but a single file with one HD audio track results in a 20-40GB file. Hope you have a lot of HDD space.

As far as Blu-ray hardware goes, I spent £39 on a Panasonic UJ-260 on eBay, which is a USB drive that can read and write Blu-rays all the way up to the 100GB BD-R XL discs. It can rip most movies in 40 minutes or so. A very decent no-frills BD drive that works fine on both my Mac and the HTPC.

Handling HD audio

One minefield in putting together an HTPC is that the capabilities of HDMI hardware vary wildly depending on hardware and driver support. A particular difficulty comes in the ability (or not) to output Dolby TrueHD and DTS-HD Master Audio as a bitstream, which allows an AV receiver to handle the decoding and processing. Most HTPC software can decode internally to some extent, however, but my choice uses a reverse-engineered open-source implementation, and I can’t help but suspect that it’s not going to do as good a job as my Denon.

As it happens, bitstreaming HD audio on AMD hardware in Linux is a new addition and doesn’t yet work reliably on my setup. TrueHD can be decoded to uncompressed PCM in XBMC, but DTS-HD leaves me only with the compressed DTS ‘core’, which is barely better than DVD. That won’t do.

Thankfully MakeMKV has the ability to convert the HD formats to the open-source FLAC, which is open and far better documented. What’s more, it actually creates smaller files, while still remaining lossless. And it’s a handy option for those releases with only PCM audio, as that can account for 8GB of audio alone.

There’s a separate post coming on this issue, complete with file size comparisons.

Subtitles

BD handles these slightly differently to DVD. Whereas DVD would have a separate, hidden subtitles for ‘forced’ subs (e.g. scenes in a foreign language in otherwise English movies), BD simply marks the appropriate lines in the main subtitle track as forced, meaning they should be shown even if subtitles are turned off.

MakeMKV has the ability to only add these forced subs to the output, but you still need to work out which track is the correct one – a movie can have separate English subtitle tracks for closed captions, commentaries, dubs vs original tracks (e.g. a direct transcription of the English dub and a more literal translation of the original audio, as on some anime releases), trivia, and more.

Handily, the community as AVS Forum has put together a spreadsheet that lists the correct subtitle tracks for various releases. It’s not comprehensive, but it has a lot of common movies. Worth bookmarking if you’re going to be doing a lot of this. Simply tick the ‘forced only’ box for the one you need.

More to come…

These are the results of my early experimentations. I’ve got a spreadsheet – when I say I’m experimenting, I mean it – on the go with the compression rates achieved by the above FLAC conversions and will share that data when I’ve converted my initial batch. Also, once this whole HTPC project is in a stable state, I’ll put together my tips on how one can be assembled for around £200. In the meantime, get a load of this…

XBMC movie library

Isn’t it beautiful?

The Hobbit and HFR

The Hobbit was my first experience of Tolkien, back in 1995 when it was our class reader in school. It had a big impact on me, and in fact I remember writing a piece of what was effectively crossover fan fiction as part of a school creative writing exercise, putting Gollum in the world of my other mid-90s obsession: Doom. I wish I could find that document as an insight into how my brain worked at a time when gaming was becoming a big deal to me.

The Hobbit: An Unexpected Journey

I grew into The Lord of the Rings and still am yet to develop the patience for The Silmarillion, and I generally loved Peter Jackson’s film trilogy ten years ago. I followed this through development hell and sulked when Guillermo Del Toro dropped out, but as excited as I was to see this vintage of Tolkien back on screen, the lack of restraint on show from Peter Jackson was a worry. King Kong was desperately in need of a trim, and then The Hobbit – a children’s book that, let’s not forget, is significantly shorter and more straightforward than any of the three LOTR novels – into two movies, with sequences not shown in the book added to tie it in more closely with The Lord of the Rings.

And then it became three films. Pardon?

I finally saw it yesterday, though, and I didn’t think it suffered much at all. It galled slightly to see scenes from the book padded with cameos from Lord of the Rings characters who don’t show up in The Hobbit, and that very Peter Jackson affliction of needing to put the cast in the middle of things for the sake of it – hello, stone-giants – but strong performances carried it. Ian McKellen, Martin Freeman and Richard Armitage in particular are outstanding. Benedict Cumberbatch also does the best on-screen depiction of a cloud since Galactus in Rise of the Silver Surfer. Expect more of him later.

That leaves the frame rate, then. Much has been written about it, some more comprehensively and authoritatively than I’ll attempt, and from what I’ve seen the general opinion is wary at best, with most critics in particular being against it. I’m not, though. I found it less obtrusive than the 3D that it does so much to improve, and when the cyclical 3D fad passes again, I wouldn’t be disappointed if HFR sticks around. Once I got accustomed to it and stopped thinking all close-ups were sped up, I experienced none of the ballyhooed issues with it looking like a soap opera.

People criticising 3D are doing it from the logical position that this is the third attempt at popularising the format and likely the third failure at making it anything other than a niche. HFR is new, cinema having been universally presented at 24fps since the advent of sound. Let’s give cinematographers a chance to work out how to shoot for it before we declare it DOA.